Guild Wars 2 Guide – Greatsword Warrior PVP

Guild Wars 2 Warrior Greatsword PvP Guide by Guttzu

Hello everyone, my name is Guttzu and welcome to my guide/review of the Warrior profession in Guild Wars 2. I want to start out by saying how impressed I was by the gameplay of Guild Wars 2. I played the game for the first time in the BWE3 but I was very pleased with how well everything flowed in sPvP. The maps were fun and the graphics were appealing. I played a warrior for 4 years in WoW but the UI and feel of Guild Wars 2, to me, surpasses WoW. Here is a little bit about my PvP past… I competed in high level arena during seasons 2 and 3 of WoW so I thoroughly enjoy the melee class which is why I stuck with Warrior for GW2! Ok enough about my gaming history; let’s get started with the build/review!

*** This guide is intended for use in 5v5 or 8v8 sPvP. The build is focused around Greatsword + Axe/Shield and the Hundred Blades/Eviscerate weapon skills. I will keep this guide updated with other viable specs and playstyles. ***

Here is a link to the build:
Link to Build

Here is a quick link to all the warrior skills on GW2 Wiki: http://wiki.guildwars2.com/wiki/List_of_warrior_skills

Brief Warrior Intro

So you are saying to yourself, “Hey I want to play a warrior so I can run into battle and just button mash and kill everyone yeah, come at me bro!!!” As much as I would like to say that is the case for warrior in GW2, sadly, it is not. This build is more focused around timing your cool-downs and knowing when to burst a target down. I found the warrior to actually be a little squishy with this build but you have good mobility and can get around in combat. Your main focus as a warrior is to dish out consistent DPS and pressure a target until you need to burst them so let’s get into a list of skills and what they mean to you as a warrior. Note that you can reference all of these skills in the “warrior skills” link above.

Greatsword Skills:

1. Greatsword Swing -> Greatsword Slice -> Brutal Strike – (No recharge)

  • Greatsword swing is the first skill in this 3 skill chain. It is decent damage and it applies a condition called “vulnerability” for 8 seconds.
  • Here is a link for vulnerability: http://wiki.guildwars2.com/wiki/Vulnerability
  • Vulnerability is a nice condition because it lowers your target’s defense.
  • Defense is a value that is listed on the hero panel. Basically the lower your defense the more incoming damage you take. Higher defense means higher reduction to incoming damage.
  • Link to Defense stat: http://wiki.guildwar…nse_(statistic)
  • The next skill is Greatsword slice. This is the same thing as Greatsword swing.
  • The final skill is Brutal strike. It does a little more damage than the first 2 skills but does not apply vulnerability.
  • Note that all three of these have the same range of 130 which means you will be spamming this as your main skill when in face-to-face melee combat. Keeping vulnerability on your target will be very important because this lowers their defense which in turn means more damage to them by you and your teammates.

2. Hundred Blades – (8 second recharge)

  • This skill has great damage potential but must be cast in ideal situations since it is a “cast” skill with an actual cast bar. Only use this spell if you know you are going to land all of its strikes or most of them. Again, this has great potential for damage but you need to cast it intelligently. A key time would be when an opponent is knocked down.
  • With that being said, this skill is the reason you go Greatsword! There is ridiculous burst damage potential and if someone gets hit by a full cast of this they are hurting pretty bad afterwards.

3. Whirlwind Attack – (10 second recharge)

  • This attack whirlwinds you in a selected direction. It does decent damage and actually damages all foes in its path. The range on this is 450 so it is a decent distance from start to finish.
  • This is a great skill because it can be used as an escape, an initiator, or a way to boost your speed while running from point to point on the map.
  • This skill takes a little while to get used to since it is – Hit once to show your possible path then hit again to actually whirlwind along that path. If this was “point your cursor in the desired direction and hit one button to whirlwind in the desired direction” that would be awesome.

4. Bladetrail – (15 second recharge)

  • Throw your greatsword at your foe. It travels to your target and returns to you, crippling foes, (for 4 seconds), along its path. The range on this is 990 so it’s a pretty decent range to chuck your greatsword.
  • I like to use this sometimes as a finisher when an enemy is running away.
  • This is actually a pretty decent skill since it cripples everyone in its path. This means everyone it hits on its way to its target and then everyone it hits on the way back.
  • Here is a link to cripple: http://wiki.guildwars2.com/wiki/Crippled
  • You can also use this as an opener to cripple your foe for 4 seconds which means they will be limping when you get in melee range with them.

5. Rush – (20 second recharge)

  • This is your basic, “charge your opponent”, skill. It has a range of 1,200 and does some damage once you get close to your enemy.
  • This is an awesome gap closer when you need to switch targets or catch up to a target that is out of melee range and running away from you.
  • You can also use it to gain speed right out of the starting area to get to your designated cap zone quicker.

– I didn’t include the Greatsword burst skill because I never used it. –

Main Hand – Axe

1. Chop -> Double Chop -> Triple Chop – (No recharge)

  • The title of the skill says it all. Single chop, then chop 2 times, then chop 3 times. Nothing special just damage.

2. Cyclone Axe – (6 second recharge)

  • This is a good aoe damage skill since you spin around and attack all nearby enemies.
  • This also applies the condition “Vulnerability” for 8 seconds.
  • Here is a link to Vulnerability: http://wiki.guildwars2.com/wiki/Vulnerability
  • Vulnerability is a nice condition because it lowers your target’s defense.
  • Defense is a value that is listed on the hero panel. Basically the lower your defense the more incoming damage you take. Higher defense means higher reduction to incoming damage.
  • Link to Defense stat: http://wiki.guildwar…nse_(statistic)

3. Throw Axe – (10 second recharge)

  • You throw your axe and deal some damage. This skill also cripples your enemy for 4 seconds. The range is 900.
  • Here is a link to cripple: http://wiki.guildwars2.com/wiki/Crippled
  • I like to use this sometimes as a finisher when an enemy is running away.
  • You can also use this as an opener to cripple your foe for 4 seconds which means they will be limping when you get in melee range with them.

* Burst Skill – Eviscerate – (10 second recharge)

  • Finally your bread and butter burst move!!!
  • Leap at your foe with a devastating attack. Effect increases with adrenaline level.
  • Basically the more adrenaline you have the more damage this will do. Note that your adrenaline is measured in 3 levels.
  • The main thing I like about this skill is that it comes with a leap. This means that this is a great gap closer and finishing move on low health targets. The leap range is 300 so it is a decent short range gap closer.

Off Hand – Shield

4. Shield Bash – (25 second recharge)

  • Bash your foe with your shield and stun them. You also leap to your enemy as the combo finisher.
  • I found this skill great to use when someone is in decent range and casting heavily on you. Pop this skill and it shuts them up. Range is 300 so you need to judge the distance correctly.
  • The stun is for 1 second. It doesn’t sound like a lot but that is 1 second that the enemy isn’t doing anything. This is a good skill and another form of a short range gap closer for the warrior.

5. Shield Stance – (30 second recharge)

  • Block incoming attacks for 3 seconds.
  • This is a great skill when you are getting focused and need 3 seconds of blocking all incoming damage.
  • Note that you are able to run around when this skill is active. You do move slower when this skill is active but hey it’s blocking all incoming damage bro, you can’t have your cake and eat it too!

Slot Skills

1. Mending – (20 second recharge)

  • This is your healing skill.
  • Heal yourself for 5,560 and remove 2 conditions.
  • Basic healing skill but knowing when to heal is important. If you heal too early then it is a waste but if you heal too late you could miss it and end up dying.

2. Bull’s Charge – (40 second recharge) 

  • Charge your foe and knock down fleeing foes.
  • This is a great closing skill to use. It also causes a 2 second knock down plus some damage when you hit your target at the end of the charge.
  • The range on this is 600 so you have a decent distance to get to your target.

3. Endure Pain – (90 second recharge)

  • Take no damage from incoming attacks for 5 seconds. Also, this skill breaks stun.
  • This is an awesome skill since it makes you invincible for 5 seconds and breaks stun. Use this if you are being heavily focused then once this skill runs out you can swap to shield stance and block incoming attacks for 3 seconds. If timed correctly that is 8 seconds for no damage while you are still hitting on your foe.
  • This is also a good skill if you are low and need to get a heal off but are being focused. You can also pop this when you want to stay in combat for a full 5 seconds and dish out DPS and not worry about incoming damage.

4. Frenzy – (60 second recharge)

  • Frenzy to gain Quickness. Take 50% more damage for the duration.
  • Note that both Quickness and Frenzy only last 4 seconds each.
  • This is a skill that needs to be used with caution since you take 50% more damage when it is activated.
  • Link to Quickness: http://wiki.guildwars2.com/wiki/Quickness
  • Link to Frenzy: http://wiki.guildwars2.com/wiki/Frenzy_%28effect%29
  • Quickness is awesome because it makes your Hundred Blades twice as fast which means insane DPS if you can land the full cast of Hundred Blades.
  • You can negate the 50% more damage effect by popping Endure Pain first then hitting Frenzy which means you take no damage for 5 seconds but you are swinging twice as fast and not taking 50% more damage, come at me Bro ahhhhh!!!

5. Elite Skill – Signet of Rage – (60 second recharge)

  • This is an awesome buffer skill.
  • The passive gives you adrenaline and activating it grants you might, fury, and swiftness for 30 seconds each.
  • Might is a boon which increases power and condition damage and stacks in intensity.
  • Link to might: http://wiki.guildwars2.com/wiki/Might
  • Fury is a boon that increases your chance to score a critical hit by 20%.
  • Link to Fury: http://wiki.guildwars2.com/wiki/Fury
  • Swiftness is a boon that increases movement speed by 33%.
  • Link to swiftness: http://wiki.guildwars2.com/wiki/Swiftness
  • Basically once you pop your signet you become captain BAMF that has increased everything and hits like a truck and runs like a cheetah.

The Actual Build and Traits selected

Strenght: 10 points

  • V-Berserkers Power. Increase damage by 2-5% depending on how much adrenaline you have. With this build you are building adrenaline extremely fast so this is a nice damage boost.
  • Another viable selection would be II-Restorative strength acting as a debuff remover when you use your heal because it removes cripple, freeze, immobilize, and weakness

Arms: 30 points

  • V-Rending Strikes. This has a 33% chance to apply “Vulnerability” on critical hits.
  • Link to Vulnerability: http://wiki.guildwar…i/Vulnerability
  • X-Momentous Greatsword. Gain might on a critical hit with a greatsword. Might is an awesome buff.
  • Link to Might: http://wiki.guildwars2.com/wiki/Might
  • XI-Furious. Critical hits grant an extra adrenaline strike. Boosting your adrenaline means you can use adrenaline needing skills quicker like Eviscerate which does more damage based on what level your adrenaline is at.
  • Link to what Adrenaline is: http://wiki.guildwars2.com/wiki/Adrenaline

Discipline: 30 points

  • V-Heightened Focus. This is a great damage booster. Gain 2% critical hit chance for 1 stage of adrenaline, 5% for 2 stages, and 9% for 3 stages. Run faster while wielding melee weapons. You run faster how awesome is that!
  • III-warriors Sprint.
  • XI- Quick Bursts. Burst skill cooldowns are reduced by 20%. This means that you can cast your eviscerate more frequently which equates to more damage.
  • Another viable skill would be X-Mobile strikes, movement skills break immobilize. You could replace either III or XI with X.

Sigils on Weapons

Greatsword: Sigil of Superior Accuracy – Gives +5% Critical chance.

  • +5% crit is nice because the build revolves around damage and other skills give increased crit chance.

MainHand/Axe: Sigil of Intelligence – Your next attack after swapping to this weapon in combat has a 100% critical chance.  

  • Here is where your eviscerate comes in and wrecks for insane crit damage. Here is how you pull it off… You build up 3 levels of adrenaline, swap to your axe/shield and immediately hit eviscerate dealing crazy amounts of damage. This can be very devastating and almost surprising when you see the big crit numbers.

OffHand/Shield: Sigil of Superior Battle – You gain 3 stacks of might for 20 seconds when swapping to this weapon while in combat.

  • This is a nice buff with might when you swap over to axe/shield from your greatsword.

Amulet and Jewel

Berserkers amulet and Berzerkers Jewel

  • These are amazing together. This is what I ran all BWE3 and it worked very nicely. The + to critical damage is awesome.  The precision buff is nice as well. Precision increases your Critical Hit chance.
  • Precision link: http://wiki.guildwars2.com/wiki/Precision

Armor Runes

Superior Rune of Divinity: +10 to all stats and 3% critical damage

  • Put this on all your armor pieces. You are going for crit and this boosts your crit damage.

Combinations

  • Your main damage combo is – Pop your trinket, pop frenzy, bull rush or charge, now you can either greatsword swing once to apply vulnerability + Hundred blades or just hit Hundred blades if they are dumb enough to stand there. If you start taking damage then pop endure pain. If they ignore you then don’t bother with ignore pain and save it for later when you need it.
  • After this initial burst you will have them down pretty low so keep smacking away with greatsword swing and keep in range with your gap closing skills.
  • Once you have built up 100% adrenaline you want to be using your greatsword and when the burst opportunity arises switch over to axe/shield and immediately hit eviscerate. Watch the big number pop up and your opponent act confused because your just WTF hit them for a BAMF ton of damage.
  • This is my usual charge in combo but the other skills work well together so theorycraft away as to what would be good situational combinations.

Warrior Videos

This is the warrior from Super Squad – Fredzw:

– Here is a link to his build: http://www.gw2build.com/builds/super-squad-fredzw-balanced-build-super-squad-fredzw-warrior-894.html
– You will notice that it is much more balanced than the typical glass cannon build. He uses Mace/Shield for his swap and the traits are more focused on survival.
-He is running Banner, Balanced Stance, For Great Justice, and traits that make shouts heal. This build is more about surviving the team fight while buffing teammates but still doing decent damage. The Mace/Shield gives good stuns and cc.

Thanks for reading!

Thank you for reading and I hope this has given you an insight into the warrior class. I will keep this guide updated and add to it after the game launches. Maybe add sections on matchups and other things. I learned a lot about the warrior class by doing this guide and I feel like it has made me more aware of what my class can do.

Guild Wars 2 Guide – Grendich Gamble Puzzle

Guild Wars 2 Grendich Gamble Puzzle Solution Guide by Gabriel

Grendich Puzzle is one of the puzzles under “Explorer” achievement which gives 10 achievement points.

This puzzle took me quite a while because I was a bit rushing it at first. You will need a lot of patience and concentration in doing this (like some hard vistas).

3 Things to learn before doing this puzzle
1.) Long jump – Press and hold W+Space, the longest jump your character can do
2.) Short jump – Press W+Space (Really short distance jumps, small landing platform)
3.) Jump – Simply press Space

So first, its location…

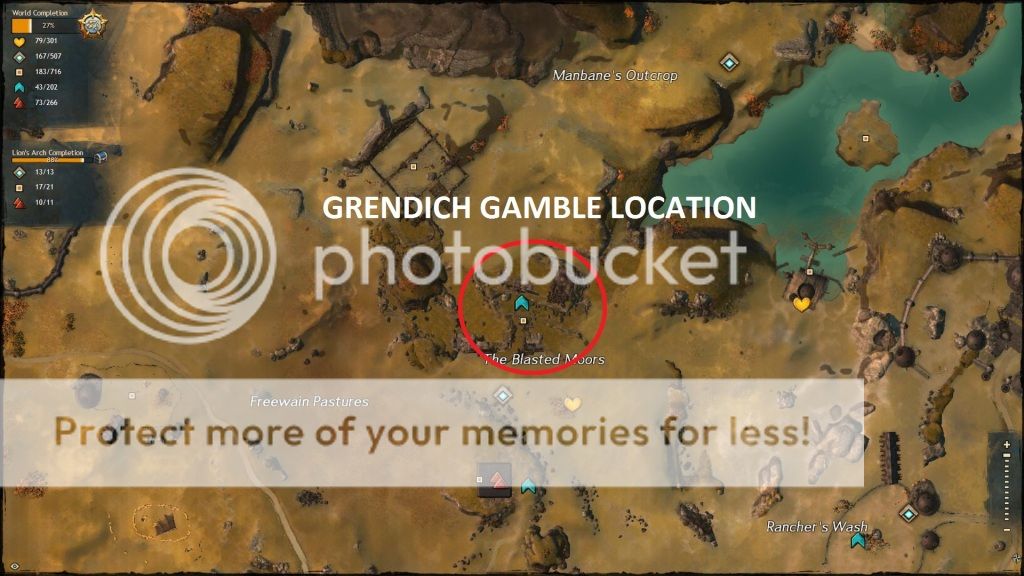
It’s in Blasted Moors under Dissea Plateau (above black citadel, on the right of wayferer foothills). This makes it more accessible to Charrs and Norns.

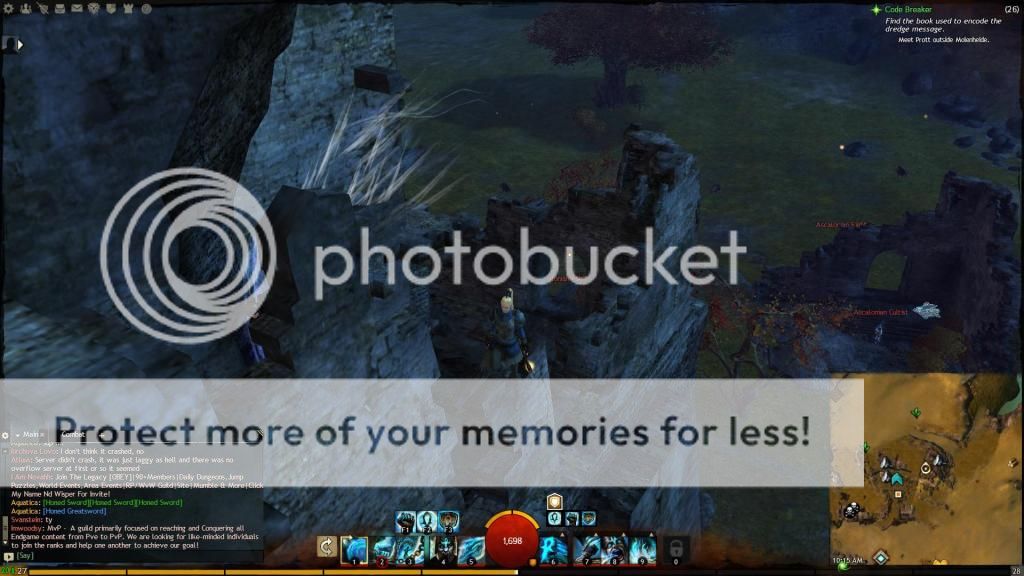
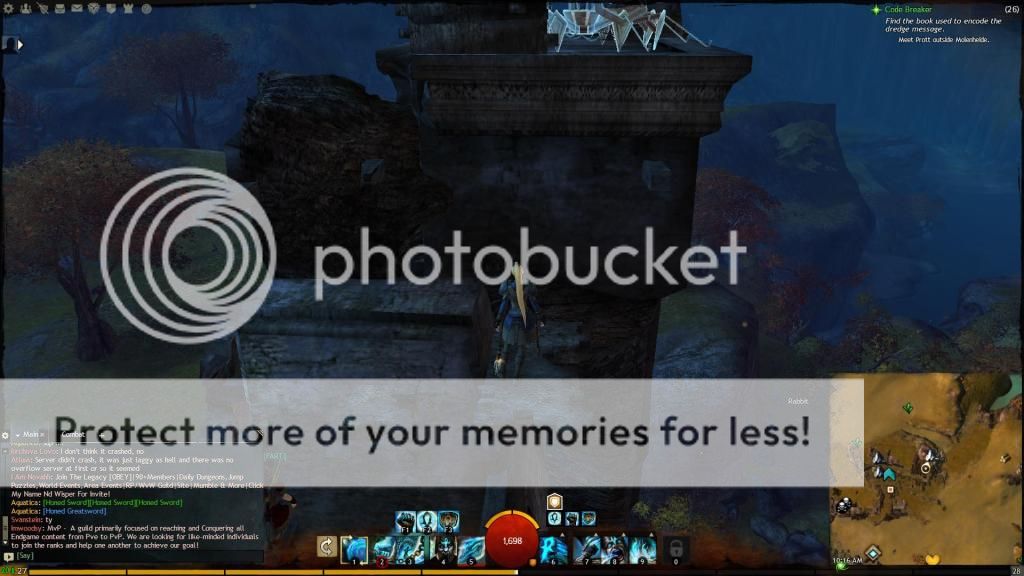
Let’s get started (Comments/Instruction are written below each picture)

Go up the stairs… You will see 3 ghost cannons, you can either destroy it or walk past it.

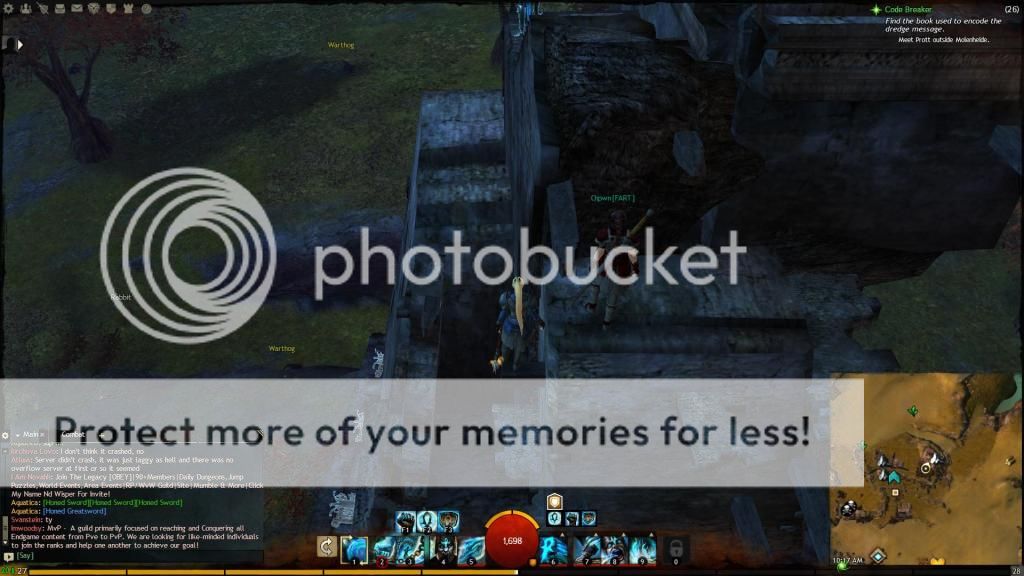
From the first stairs, turn right for another set of stairs, go up again. Proceed with caution, take note of some cracks on the floor.

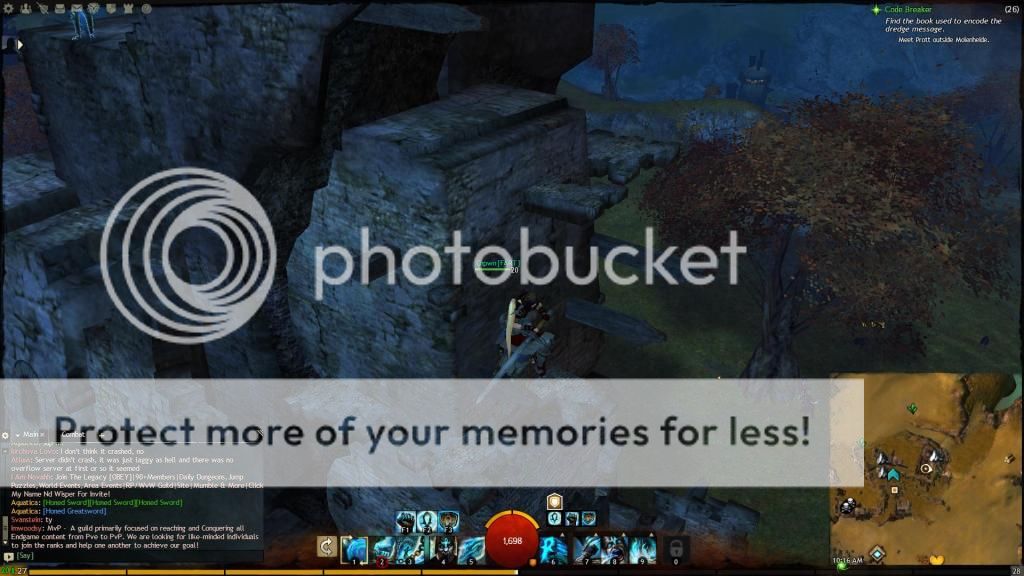
From the second set of stairs turn right again and you will see that the next set of stairs is in the other side. Do a LONG JUMP and land on the small space.

You are now on the third set of stairs, turn right again.

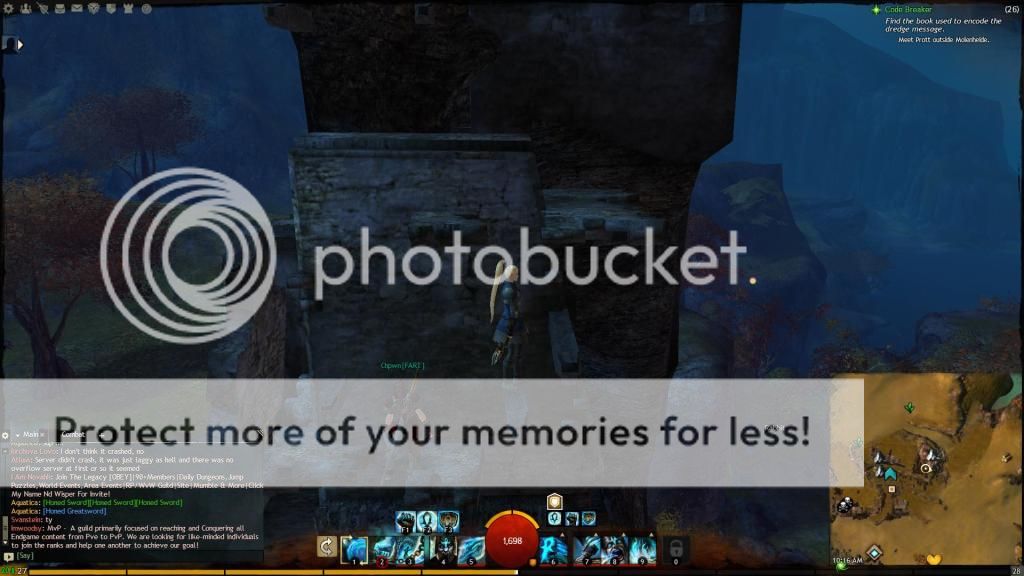
From here do a JUMP.

Here is where the hard part starts, go straight then do a JUMP on the lowest part of the destroyed wall

From there do a JUMP to your right. Then face north.

After facing north. Do a LONG JUMP to this space.

Do a SHORT JUMP to the first small piece of wood you see.

On to the next one, do another SHORT JUMP.

And… another SHORT JUMP.

From there, JUMP to this part.

This is one of the hardest parts in this puzzle, you have to do this slowly. Go to the edge of the platform then slowly move to the left, and drop to the small wood on the left side.

Then do a LONG JUMP to the destroyed part of the wall, north of your character.

You’re almost done, this is another toughest part of the puzzle.

First, LONG JUMP on the lowest wood.

Then do another LONG JUMP to the destroyed wall.

Then another LONG JUMP to the wood.

Then do a SHORT JUMP to the wood right next to it. (This is a bit tough because the camera view will act a little buggy because you’re up against the wall. Do it slowly)

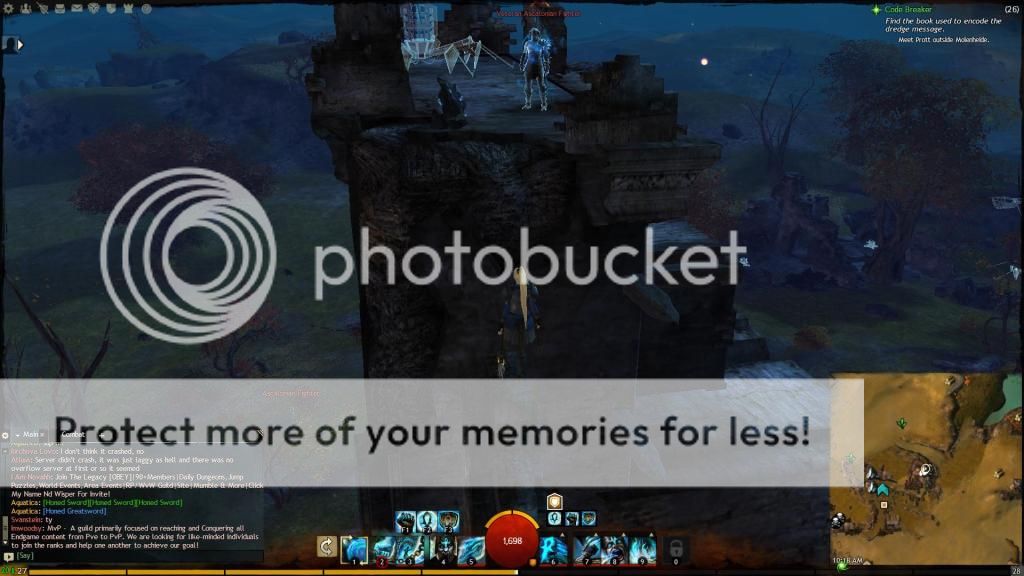
From the wood, do a LONG JUMP and land on the floor near the stairs. Go up the stairs.

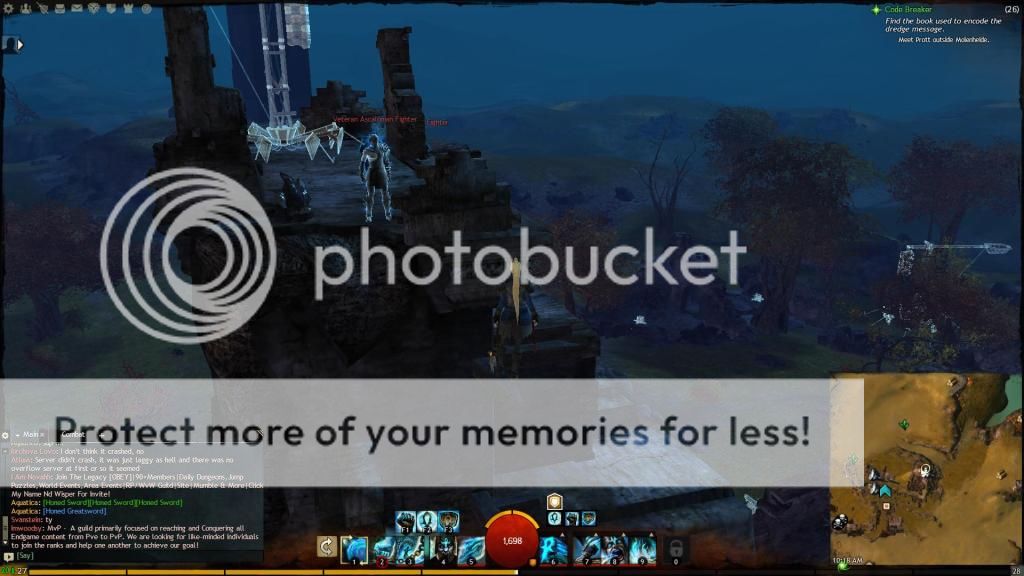
On top you’re gonna fight a veteran ascalonian and a ghost trebuchet.

Now you’re done you will unlock the achievement and get 10 achievement points

Guild Wars 2 Guide Tailoring Level 1 – 400 Guide

Guild Wars 2 Tailoring Guide level 1 – 400


Published on Friday, 21 September 2012 19:01


Written by Zpyr0


Hits: 80863
PLEASE NOTE: Take the HUGE advantage of using Craft Boosters and utilizing the WvWvW Crafting Buffs. The guides were written on “Over Flow” servers, meaning I received no Crafting Bonuses. If you have the WvWvW buff and the Crafting booster, you will NEED to skip a great deal of this guide. Please always remember this is a guide for crafting, and it can only do so much. It will not be perfect for you, critical crafting success makes crafting extremely random.
If your crafting critical rate is %15, that doesn’t always mean you will get 15 critical out of 100. You could get 150 critical crafts in a row or you could have zero critical crafts for 75 crafts. So I can only provide a strong base to help guide you.
Shopping List Notes:YOU CAN ALTER THE SHOPPING LIST, this is JUST a guide but be advised if you change things it can get nasty quick. You have to make sure whatever you substitute is equivalent to what you are replacing. If the Fine Materials/Tier Materials are for level25 you can only substitute level25 Fine Materials/Tier Materials. Sounds confusing? It easily can be haha that is why you should just follow the guide.

Guild Wars 2 Tailoring 1-75

SHOPPING LIST:
42 Spools of JuteSpools of Jute (Purchased from a Vendor)
Craft Phase – Refinements:
66 Bolts of Jute – Requires 132 Jute Scraps
33 Stretched Rawhide Leather Square – Requires 66 Rawhide Leather Section[s]
40 Spools of Jute – Purchased from Crafting Vendor for 80c per 10 each
Craft Phase – Components / Base Armor Sets:
 NOTE: 
You will not be combining these without an inscription! All crafts using the potions and weapons are discovery only.
Boots:
Gloves:
Craft Phase – Low Insignia:
4* Malign Jute Insignia[s] = 1 Bolt[s] of Jute + 3 Tiny Venom Sac[s]
4* Mighty Jute Insignia[s] =  1 Bolt[s] of Jute + 3 Vial[s] of Weak Blood
*Save for Helm and Shoulder*
2* Vital Jute Insignia[s] = 1 Bolt[s] of Jute + 3 Bone Chip[s]
Craft Phase – Discoveries:
Jute Sandal Sole[s] + Jute Sandal Upper[s] + Malign/Vital Insignia
Jute Wristguard Padding[s] + Jute Wristguard Strap[s] + Malign/Vital Insignia
DO NOT USE MIGHTY INSIGNIA
You should be LEVEL 25+ 
Craft Phase – Components / Base Armor Sets:
Mask/Helm:
Craft Phase – High Insignia:
4* Precise Jute Insignia[s] = 1 Bolt[s] of Jute + 3 Tiny Claw[s]
4* Healing Jute Insignia[s] = 1 Bolt[s] of Jute + 3 Tiny Totem[s]
Craft Phase – Discoveries:
Jute Headpiece Padding[s] + Jute Headpiece Strap[s] + Malign/Mighty/Vital/Precise/Healing Insignia
Jute Sandal Sole[s] + Jute Sandal Upper[s] + Precise/Healing Insignia
Jute Wristguard Padding[s] + Jute Wristguard Strap[s] + Precise/Healing Insignia
You should be LEVEL 50+
Craft Phase – Base Armor Set Pieces part 3: 
Automatic Discoveries and are located in the crafting window under CRAFTING COMPONENTS
Shoulder Pads:
Craft Phase – Embroided Insignia:
4* Malign Embroidered Jute Insignia[s] = 1 Bolt[s] of Jute + 5 Spool[s] of Jute + 8 Tiny Venom Sac[s]
Craft Phase – Discoveries:
Jute Epaulet Padding[s] + Jute Epaulet Panel[s] + Malign/Mighty/Vital/Precise/Healing Insignia
You will now have a Glove, Boot, Shoulder and Helm Set remaining. Simply combine each set with Malign Embroidered Jute Insignia[s]
You should be LEVEL 75+ 
 NOTE: 
If you are not 75+ you will need to craft a different Embroided Inscription and Armor set
Shopping List:
2 Rawhide Leather Square[s] (buy from Trading Post unless you have 2 extra)
3 Bolt of Jute
6 Spool of Jute
8 Tier 1 items EXCEPT Venom Sac[s]
  • Craft Glove Lining and Panel
  • Craft (1) Inscription of your choosing
    • 8* x Material + 1 Dowel = Embroided Insignia
  • Combine Embroided Insignia with Glove Pieces

Guild Wars 2 Tailoring 75-125

SHOPPING LIST:
122 Wool Scrap[s]Wool Scrap[s]
56 Spools of WoolSpools of Wool (Purchase from Crafting Vendor or the Trading Post)
24 Bone Shard[s]Bone Shard[s]
12 Small Fang[s]Small Fang[s]
Craft Phase – Refinements:
61 Bolts of Wool – Requires 122 Wool Scraps
31 Cured Thin Leather Square[s] – Requires 62 Thin Leather Section[s]
56 Spools of Wool – Purchased from Crafting Vendor
Craft Phase – Components / Base Armor Sets:
Boots:
Gloves:
Helm:
Shoulder Pads:
Craft Phase – Low Insignia:
2* Ravaging Wool Insignia[s] = 1 Bolt[s] of Wool + 3 Small Venom Sac[s]
Craft Phase – Discoveries:
Later in the guide I will descibe this phase as such
Combine Helm/Shoulder with Ravaging Wool Insignia[s]
You should be LEVEL 100+
Craft Phase – High Insignia:
4* Rejuvenating Wool Insignia[s] = 1 Bolt[s] of Wool + 3 Small Totem[s]
4* Honed Wool Insignia[s] = 1 Bolt[s] of Wool + 3 Small Fangs[s]
3* Hearty Wool Insignia[s] = 1 Bolt[s] of Wool + 3 Small Scale[s]
Craft Phase – Discoveries:
Combine All armor sets with High Insignia making a total of 11 discoveries
  Note: you will not combine boots with Hearty insignia
Combine Boots/Glove/Helm/Shoulder with Rejuvenating Wool Insignia[s]
Combine Boots/Glove/Helm/Shoulder with Honed Wool Insignia[s]
Combine Glove/Helm/Shoulder with Hearty Wool Insignia[s]
You should now be LEVEL 125+
 
Craft Phase – Embroided Insignia:
4* Ravaging Embroidered Wool Insignia[s]  = 1 Bolt[s] of Wool + 5 Spool of Wool  + 8 Small Venom Sacs[s]
3* Vigorous Embroidered Wool Insignia[s] = 1 Bolt[s] of Wool + 5 Spool of Wool + 8 Bone Shard[s]
Craft Phase – Discoveries:
Combine Boots/Glove/Helm/Shoulder with Ravaging Embroidered Wool Insignia[s]
Combine Glove/Helm/Shoulder with Vigorous Embroidered Wool Insignia[s]
You should be LEVEL 150+ 
 NOTE:  IF you are not level 150

Guild Wars 2 Tailoring 150-225

SHOPPING LIST:
124 Cotton Scrap[s]Cotton Scrap[s]
50 Cured Coarse Leather SquareCoarse Leather Scrap[s]
56 Spools of CottonSpools of Cotton (Purchase from Crafting Vendor or the Trading Post)
38 Venom Sac[s]Venom Sac[s]
24 Bone[s]Bone[s]
12 Fang[s]Fang[s]
12 40px-TotemTotem[s]
40px-ScaleScale[s]
Craft Phase – Refinements:
62 Bolts of Cotton – Requires 124 Cotton Scraps
25 Cured Coarse Leather Square[s] – Requires 50 Coarse Leather Section[s]
56 Spools of Cotton – Purchased from Crafting Vendor
Craft Armor Set Pieces Phase 1:
These are all Automatic Discoveries and are located in the crafting window under CRAFTING COMPONENTS 
Boots:
Gloves:
Helm:
Shoulder Pads:
Craft Phase – Low Insignia:
2*Ravaging Cotton Insignia[s] = 1 Bolt[s] of Cotton + 3 Venom Sac[s]
Craft Phase – Discoveries:
Combine Helm/Shoulder with Ravaging Cotton Insignia[s]
You should be LEVEL 175+
Craft Phase – High Insignia:
4* Rejuvenating Cotton Insignia[s] = 1 Bolt[s] of Cotton + 3 Totem[s]
4* Honed Cotton Insignia[s] = 1 Bolt[s] of Cotton + 3 Fangs[s]
3* Hearty Cotton Insignia[s] = 1 Bolt[s] of Cotton + 3 Scale[s]
Craft Phase – Discoveries:
Combine All armor sets with High Insignia making a total of 12 discoveries
Craft Phase – Discoveries:
Combine All armor sets with High Insignia making a total of 11 discoveries
  Note: you will not combine boots with Hearty insignia
Combine Boots/Glove/Helm/Shoulder with Rejuvenating Cotton Insignia[s]
Combine Boots/Glove/Helm/Shoulder with Honed Cotton Insignia[s]
Combine Glove/Helm/Shoulder with Hearty Cotton Insignia[s]
You should be LEVEL 200+
Craft Phase – Embroided Insignia:
4* Ravaging Embroidered Cotton Insignia[s]  = 1 Bolt[s] of Cotton + 5 Spool of Cotton  + 8 Venom Sacs[s]
3* Vigorous Embroidered Cotton Insignia[s] = 1 Bolt[s] of Cotton + 5 Spool of Cotton + 8 Bone[s]
Craft Phase – Discoveries:
Combine Boots/Glove/Helm/Shoulder with Ravaging Embroidered Cotton Insignia[s
Combine Glove/Helm/Shoulder with Vigorous Embroidered Cotton Insignia[s]
You should be LEVEL 225+
 NOTE:  IF you are not level 225+

Guild Wars 2 Tailoring 225-300

SHOPPING LIST:
124 40px-Linen ScrapLinen Scrap[s]
56 40px-Spool of Linen ThreadSpools of Linen (Purchase from Crafting Vendor or the Trading Post)
Craft Phase – Refinements:
 56 Bolts of Linen – Requires 112 Linen Scraps
31 Cured Rugged Leather Square[s] – Requires 62 Rugged Leather Section[s]
56 Spools of Linen – Purchased from Crafting Vendor for
Craft Phase – Components / Base Armor Sets:
Boots:
Gloves:
Helm:
Shoulder Pads:
Craft Phase – Low Insignia:
2* Valkyrie Linen Insignia[s] = 1 Bolt[s] of Linen + 3 Sharp Fangs[s]
Craft Phase – Discoveries:
Combine Helm/Shoulder with Valkyrie Linen Insignia
LEVEL 250+
Craft Phase – High Insignia:
4* Cleric’s Linen Insignia[s] = 1 Bolt[s] of Linen + 3 Engraved Totem[s]
4* Explorer’s Linen Insignia[s]= 1 Bolt[s] of Linen + 3 Sharp Claw[s]
3* Berserker’s Linen Insignia[s] = 1 Bolt[s] of Linen + 3 Vial[s] of Thick Blood
Craft Phase – Discoveries:
Combine All armor sets with High Insignia making a total of 11 discoveries
You should be LEVEL 250+
Craft Phase – Embroided Insignia:
4* Valkyrie Embroidered Linen Insignia[s] = 1 Bolt[s] of Linen + 5 Spool of Linen  + 8 Sharp Fang[s]
3* Carrion Embroidered Linen Insignia[s] = 1 Bolt[s] of Linen + 5 Spool of Linen + 8 Heavy Bone[s]
Craft Phase – Discoveries:
Combine Boots/Glove/Helm/Shoulder with Valkyrie Embroidered Linen Insignia[s]
Combine Glove/Helm/Shoulder with Carrion Embroidered Linen Insignia[s]
You should be LEVEL 300+
 NOTE:  IF you are not level 300+

Guild Wars 2 Tailoring 300-375

SHOPPING LIST:
112 40px-Silk ScrapSilk Scrap[s]
38 40px-Large FangLarge Fang[s]
24 40px-Large BoneLarge Bone[s]
12 40px-Large ClawLarge Claw[s]
Craft Phase – Refinements:
 56 Bolts of Silk – Requires 112 Silk Scraps
31 Cured Thick Leather Square[s] – Requires 62 Thick Leather Section[s]
56 Spools of Silk – Purchased from Crafting Vendor
Craft Phase – Components / Base Armor Sets:
Boots:
Gloves:
Mask:
Shoulder Pads:
Craft Phase – Low Insignia:
2* Valkyrie Silk Insignia[s] = 1 Bolt[s] of Silk + 3 Large Fangs[s]
Craft Phase – Discoveries:
Combine Helm/Shoulder with Valkyrie Silk Insignia[s]
You should be LEVEL 325+
Craft Phase – High Insignia:
4* Rampager’s Silk Insignia[s] =  1 Bolt[s] of Linen + 3 Potent Venom Sac[s]
4* Explorer’s Silk Insignia[s]= 1 Bolt[s] of Linen + 3 Large Claw[s]
3* Berserker’s Silk Insignia[s] = 1 Bolt[s] of Linen + 3 Vial[s] of Potent Blood
Craft Phase – Discoveries:
Combine All armor sets with High Insignia making a total of 11 discoveries
  Note: you will not combine boots with Berserker’s insignia
Combine Boots/Glove/Helm/Shoulder with Rampager’s Silk Insignia[s]
Combine Boots/Glove/Helm/Shoulder with Explorer’s Silk Insignia[s]
Combine Glove/Helm/Shoulder with Berserker’s Silk Insignia[s]
You should be LEVEL 350+
Craft Phase – Embroided Insignia:
4* Valkyrie Embroidered Silk Insignia[s] = 1 Bolt[s] of Silk + 5 Spool of Silk + 8 Large Fang[s]
3* Carrion Embroidered Silk Insignia[s] = 1 Bolt[s] of Silk + 5 Spool of Silk + 8 Large Bone[s]
Craft Phase – Discoveries:
Combine Boots/Glove/Helm/Shoulder with Valkyrie Embroidered Silk Insignia[s]
Combine Glove/Helm/Shoulder with Carrion Embroidered Silk Insignia[s]
You should be LEVEL 375+
 
 NOTE:  IF you are not level 375+

THE HOME STRETCH 375-400

Ok you will need to buy 2-4 recipes from the Crafting Vendor that are level 375. These recipes cost 672 karma. This is an example! Please, feel free to buy whatever Recipes you have the most mats for. If you have the 15 Vial[s] of potent blood, make those inscritions etc etc
SHOPPING LIST:
24 Bolt of Silk or 48 Silk Scraps
45 Large Bone[s]
45 Large Claw[s]
 
Craft Phase – Base Armor Set Pieces: 
Gloves:
Mask:
Shoulder Pads:
Craft Phase – Discoveries:
Combine the Gloves and Masks with the Intricate Silk Insignia and TADA!

‘Rise of the Guardians:’ What the Critics Are Saying

iNews Hollywood


CGI:

THR’s Todd McCarthy described the film as “an attractively designed but overly busy and derivative mishmash of kid-friendly elements.”

features a ragtag team of children’s stories staples including Santa Claus, the Easter Bunny, the Tooth Fairy, the Sandman and Jack Frost, all of whom go on an adventure to keep children safe.

The DreamWorks Animation film features voice work from Alec Baldwin, Hugh Jackman, Isla Fisher and Chris Pine, and is expected to rake in $31 million or $32 million for its five-day Thanksgiving holiday opening, which would be a lower debut than recent films from the studio.

PHOTOS: Fall Movie Preview 2012: Major New Releases From Spielberg, Jackson, Tarantino, the Wachowskis, Burton and More

From first-time director Peter Ramsey, the film is based on the book series by William Joyce, as well as his short film

holds a 73 percent on Rotten Tomatoes, and below are what some…

View original post 427 more words

Film Review: Sucker Punch

rosslangager

Sucker Punch (2011; Directed by Zack Snyder)

Sucker Punch, in the evident impetus of its conception, puts me in mind of King Kong. Merian Cooper decided to incorporate a romance into his visionary spectacle of the exotic after criticism of the lack of that element in his previous films. Zack Snyder, often pigeonholed for encoding an underlying chauvinism into his visionary spectacles of CG-age stark morality (300 and Watchmen), decided to represent a woman’s perspective in his latest hyper-stylish offering. But Cooper could not but echo the fundamental conservative democratic assumptions that defined his worldview, destroying his now-beloved giant ape atop a towering symbol of the triumph of arrogant industrial hubris over wild, primitive nature. And Snyder, though he seeks to render a species of modern feminism in iconic cinematic terms, winds up reinforcing the very patriarchal structures he seeks to viciously demolish. Or… does…

View original post 772 more words